READ THESE INSTRUCTIONS BEFORE USING THIS PRODUCT! This is not a toy.
These instructions must be read and understood completely before using the product.
NEVER allow children or inexperienced adults to observe the sun with a telescope and wedge or filter without the supervision of a knowledgeable adult.
NEVER remove a solar filter or wedge without first placing the front lens cap on the telescope.
ALWAYS securely fasten Solar Wedge securely to the telescope.
ALWAYS remove any optical finder containing lenses from the telescope before pointing it at the sun because you, or someone else may look through it by mistake. Use the safe Altair Solar Finder Code: SOLARFINDER.
DO NOT use this product with a Schmidt Cassegrain (SCT), Newtonian, Maksutov or any other telescope containing mirrors.
NEVER add any kind of filter (like solar continuum filter or ND moon filter) BEFORE the Solar Wedge, as it may crack.
NEVER add any kind of Barlow lens BEFORE the Solar Wedge, as it may crack. MAKE CERTAIN there are no filters, Barlow lenses, field flatteners or focal reducers in the space between Solar Wedge and telescope lens.
Introduction:
The Altair Solar Wedge (Herschel Wedge) replaces the 2″ star diagonal at the rear of your refractor telescope. The Solar Wedge transmits a greatly reduced, safe amount of light to the eyepiece or camera. This makes it safe for visual use with an eyepiece, or astrophotography with a high speed CMOS camera like Altair GPCAM or Hypercam.
Solar wedges give higher-contrast images than front-mounted metallized solar film filters or glass solar filters, because there are no reflections between the filter and front telescope lens.
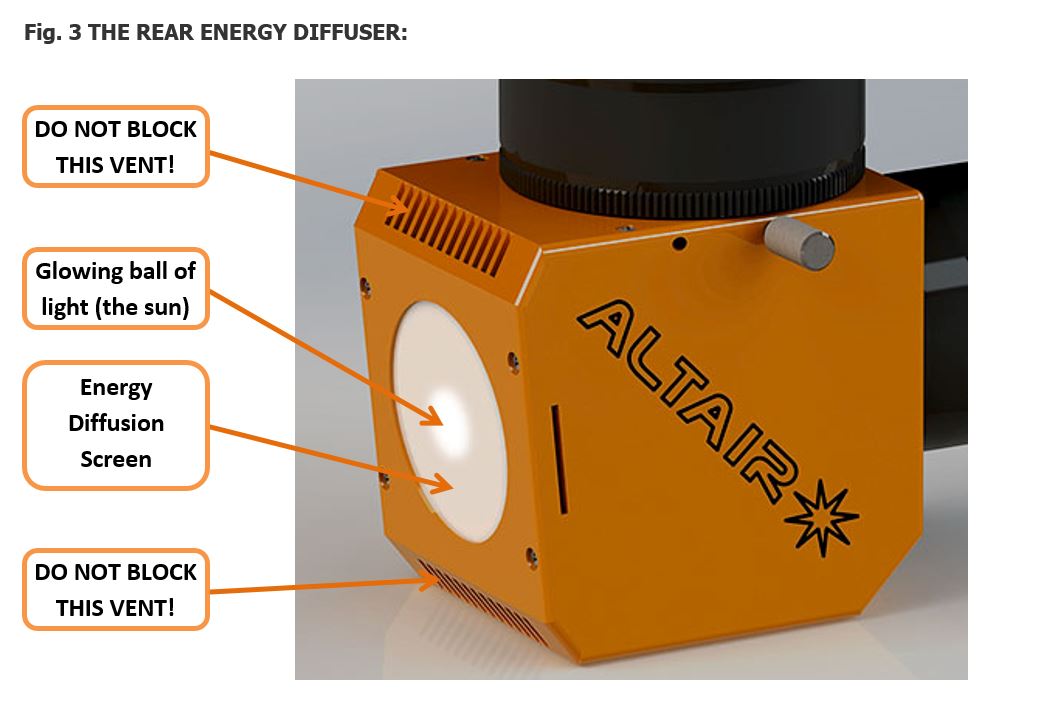
The Altair Imaging-Ready Solar Wedge directs energy into a special extra thick Polycrystalline Ceramic diffuser disc at the back of the Wedge. The diffuser disc has the added benefit of acting like a “solar finder”. The sun appears as a “ball of light” on the disc. Move your telescope until the ball of light is in the centre to align the telescope with the sun.
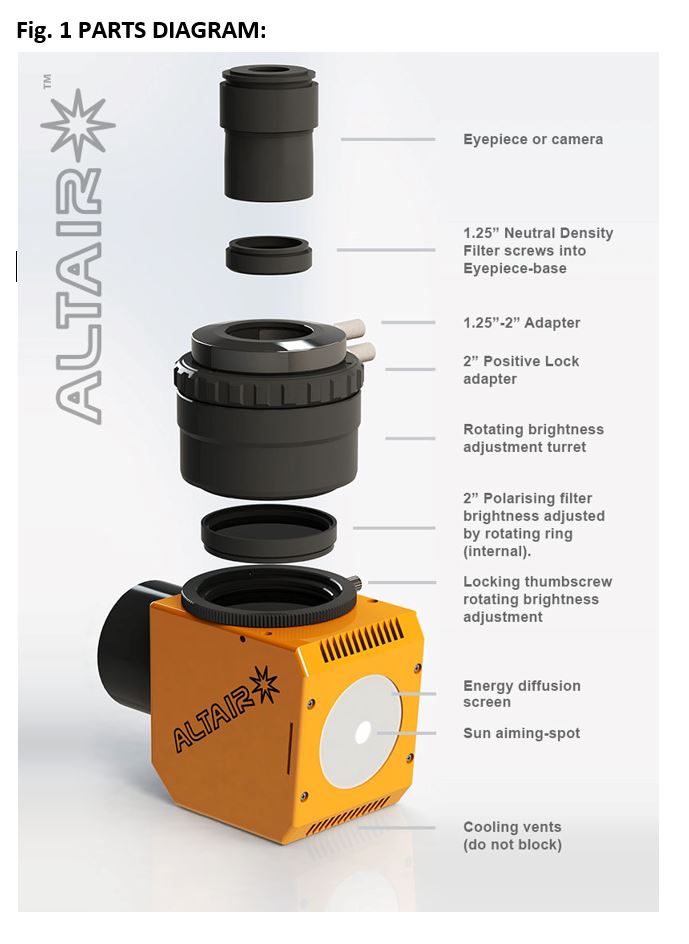
It is important to familiarise yourself with the parts before use.

SAFE SETUP PROCEDURE:
- With the front objective lens caps still in place. Remove the finder scope from the telescope and replace it with a safe non-optical solar finder, such as the Altair Solar Finder. (Code: SOLARFINDER)
- The thumbscrews are kept in a separate bag for shipping. Screw the smallest thumbscrew (E) into the hole in the side of the casing. Leave it a little loose. Insert the other two larger thumbscrews (A & C) as shown in 2.
- Fully insert the Solar Wedge in place of your existing 2″ diagonal mirror on your refractor telescope and fasten it securely. Screw the included 1.25” Neutral density filter into the base of a low-power 1.25″ eyepiece (see 1).
- Insert a low power 1.25” eyepiece into 25″-2” eyepiece adapter (B) on the back of the Solar Wedge. Tighten the little thumbscrew (A) to secure the eyepiece.
- Point the telescope at the sun until it’s centred in the external solar-finder. DO NOT REMOVE THE TELESCOPE FRONT LENS CAP, UNTIL THE SUN IS CENTRED IN THE SOLAR FINDER, ELSE DAMAGE TO YOUR TELESCOPE MAY OCCUR.
- Now the telescope is roughly aligned to the sun. Remove the front lens cap from the telescope. A glowing ball of light (See Fig. 3 above) should appear on the translucent Energy Diffusion Screen on the rear of the Altair Solar Wedge. Move the telescope slightly so the glowing ball of light is in the centre of the disc.
- Approach the telescope, and look into the eyepiece. Some prefer to hold a paper in front of the eyepiece to check, because it can be uncomfortably bright like a light bulb. If the image appears too bright, loosen the side locking thumbscrew and rotate the Brightness Adjustment Turret Top (F) until it’s dimmer. Fasten the turret top locking screw (E) in this position and remove the eyepiece. Remove the neutral density filter from the eyepiece, and put the eyepiece back in. It may still be a bit bright, so reduce the brightness further by rotating the Brightness Adjustment Turret Top (F).
- You can now fine-tune the brightness further by rotating the turret-top and when the correct brightness is achieved, locking it with thumbscrew (E) to prevent unwanted changes in brightness. You will find that high power eyepieces or Barlow lenses make the image dimmer, so require a little additional brightness. Note: Always place Barlow or filters behind the Herschel Wedge, NOT in front of it because they can overheat and melt or crack.
- The 2” to 1.25” Adapter eyepiece holder (B) can be removed for larger 2” eyepieces, 2” camera nosepieces and Barlow lenses by twisting the knurled ring on the 2” Positive Lock Adapter. The Positive Lock Adapter has a thumbscrew (C) to lock it closed. This is useful for public viewing, making it more difficult to remove the eyepiece. It is not necessary to tighten this thumbscrew to retain the accessory.
