The Altair-SkyShed telescope pier system is unique because it can be adjusted in levelling and rotation after it’s installed and bolted down, so you don’t need to be an expert builder to achieve a nice, neat installation. There are many ways to install your pier, and these instructions provide general guidance but you may decide to follow a different path.
Overview of contents: In Section 1, we outline the most common installation methods. In Section 2,
we explain how to install the pier-top and mount-adapter. In Section 3 we provide tips on decking
installation, and caring for your pier.
Section 1: The two most common ways to install your pier:
- Installation on an existing hard masonry or concrete surface with the straight bolt option, and chemfix glue or expanding bolts to anchor the pier.
- Pouring you own concrete base, and using the L-Bolt option, setting the bolts in the concrete:
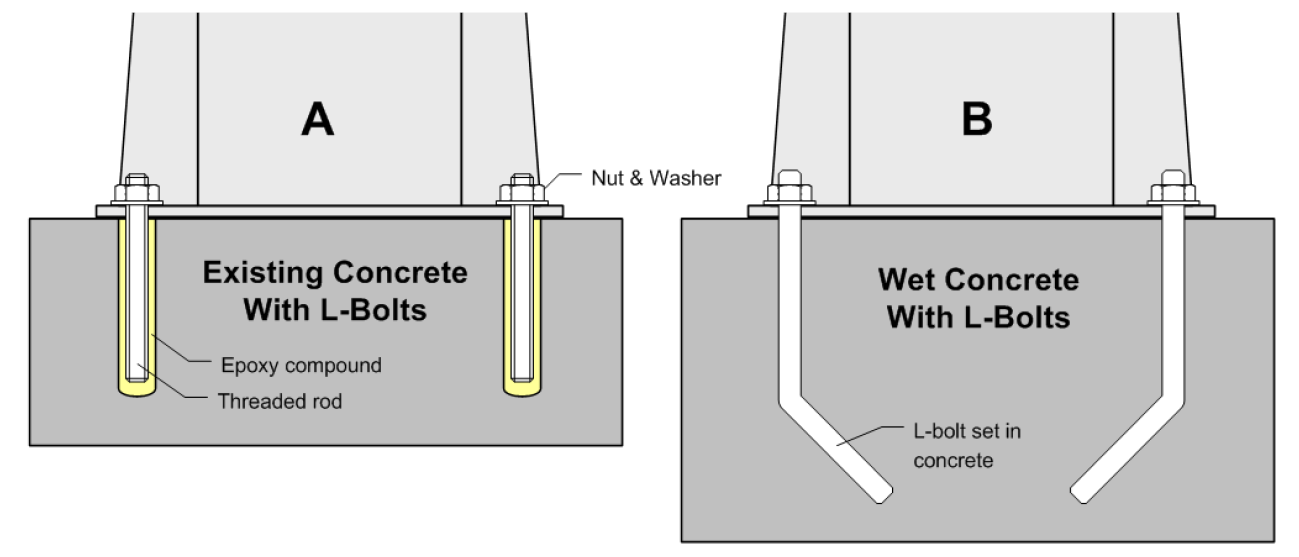
The two methods of fixing a telescope pier to a concrete surface
Existing hard surfaces, such as masonry or concrete:
1) You will have chosen the 4x M12 nuts, 4x M12 bolts, and 4x M12 threaded rods when ordering.
2) Make sure that the concrete or masonry surface is at least 6” thick. The thicker the better.
3) Place the pier on the surface, and mark the surface through the 4x base-holes clearly.
4) Drill the holes with a 12mm masonry drill bit. Check the depth. You may need to cut down the M12
metal studding provided, and you should leave about 60mm protruding from the base of the pier to
hold the nut and washer. We suggest the cut side is pointing downwards so you have a good thread
on the top side.
5) Pour a “builder’s epoxy” formula or other construction glue compound into the holes, and place the
straight bolts provided into the holes. Ensure they are 90 degrees to the surface.
6) When the epoxy has set, and before tightening the pier down with the 4x nuts and 4x washers
provided, use a little anti-seize compound or grease on the threads to make removal easier in the
future.
7) Place the pier-top on the pier, rotate into position and tighten it down.

Pier installed on existing hard surface
“Wet concrete method”. Installing your Altair-SkyShed Pier on a new concrete block:
1) You will have 4x M12 nuts, 8x M12 bolts, and 4x M12 threaded rods with this option.
2) Dig a hole about 60-90cm deep and 50x50cm to 60x60cm width
3) The size and depth of the hole depends on your ground conditions. If in doubt, talk to a builder or dig a test hole.
4) You can screw a wooden template to plywood “formers” for a neat level base protruding from the ground, or you can use paving slabs to contain the concrete level with the ground. You can even let the formers protrude well above ground for a “plinth”. The main purpose of a raise plinth is to have the concrete base both level and slightly higher than the ground level so that water doesn’t collect around the base of the pier.
5) Calculate the volume of concrete you require, so you know how many bags to order i.e. width x
depth = volume in cubic cm. We recommended with 3-4x parts aggregate (consisting of small stones
& builder’s sand) to 1x part concrete. Better still, simply buy pre-mixed concrete. If pre-mixed, we
recommend a “slow setting” concrete, to give you time to position your plywood pier template. Fast setting concrete tends to crack easily when it goes off especially at night time when things cool down.
6) We recommend making a wooden base template measuring a minimum of 40x40cm or larger, depending on the pier base size you’re planning. This can be made from any scrap wood such as plywood as long as it’s flat. Place the pier on the template, and mark the base-holes with a marker pen, then drill four 12mm diameter holes with a hand drill. Use a 12mm “wood” drill bit for best accuracy. Once the holes are drilled, fasten the L-Bolts in place using the 4x included M12 washers and 8x included M12 L-bolts in the “L-bolt” option pack. The washers go on top of the template to make sure the L-Bolts don’t change orientation and stay straight. Save the washers to use later between the pier base bolts and the pier base. Make sure the bolts are positioned correctly and test fit to the pier base, before pouring the concrete.
7) We recommend doing a test-fit of the pier template onto the plywood former beforehand, and checking fit and levelling with a spirit level. We recommend screwing the template to the formers, or putting a heavy weight on top to allow the concrete to set without removing the template. This results in less chance of cracking as the concrete cools down. Tip: The pier base has a 32mm hole, through which you can introduce cables running up from the base, through the pier top to the mount. If desired, before pouring the concrete, place a soft plastic pipe through the hole and out of the side of the concrete, through which you can pull the cables for a neat job.
8) Add some hardcore rubble such as broken brickwork or roof tiles and such (but no organic matter) to the hole, and tamp it down hard to form a base layer, then fill the hole with concrete mix in 2 or 3
stages, tamping the wet concrete down to get rid of air-bubbles between each stage. Do not leave too much time between the stages, or the concrete will start to set in layers. We recommend slow-setting “normal” concrete. Quick-setting concrete is not recommended. Certainly do not use “post mix”.
9) Flip the wooden pier template over, and slowly push it into the wet concrete until some excess
concrete comes out the sides between the former and the top template. Screw it down or weigh it down by using wood screws along the edge of the template and fasten them into the former. You will be surprised how much weight you need. Once the pier template is settled down nicely, you can scrape any excess concrete off from the sides with a trowel. Leave it for a day or so, to reach maximum strength. Tip: When pushing the L-Bolts into the wet concrete, do it gently and slowly and then when they are almost fully in you can “wiggle” them a little to get rid of air bubbles.
10) When the concrete has set, unscrew the top bolts from the plywood template. The lower bolts will
now be embedded in the concrete, and should be level with the base of the pier. You can leave them sticking out where they are. Some customers paint or coat the concrete after it’s set, so that it doesn’t soak up moisture, and to make it look neater. Use a good quality masonry paint or concrete floor sealer. Painting the newly set concrete with PVA can stop it cracking and you can always wash it off afterwards. There are also numerous ways to prime treat new concrete before painting it which are beyond the scope of this article. Be careful if you use acid etch, because it will eat away the protruding bolts. It would be best to coat anything made of metal with wax or something to stop acid attacking it.
11) When you are satisfied with the concrete mounting surface, carefully lower the pier in position. It needs to be lowered straight on to avoid damaging the bolt threads (Please be careful not to hurt your back – the base weighs approx. 30kg and non-slip gloves are recommended). Before tightening the pier down with the nuts and washers provided, and use a little anti-seize compound or just normal grease on the threads, to make removal easier in the future. You do not need to over-tighten the pier bolts, it doesn’t increase the strength or stability and you can inadvertently strip the threads. Threads coated in grease are much easier to overtighten and damage due to the lower friction therefore do be aware of this. A reasonably well balanced telescope will not place much strain on the base-bolts in any case and the base has a large contact area. Tip: Do not install rubberised compounds or any soft material between the pier and the concrete base. It’s best for the base to rest directly in contact with a hard surface like concrete. Your pier is zinc-coated and powder coated, to avoid corrosion unlike cheaper, painted piers.
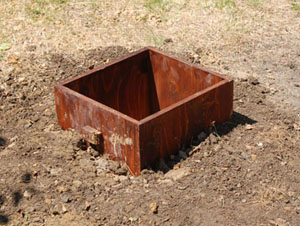
Example of a pier former before pouring concrete. This one protruded slightly above ground.
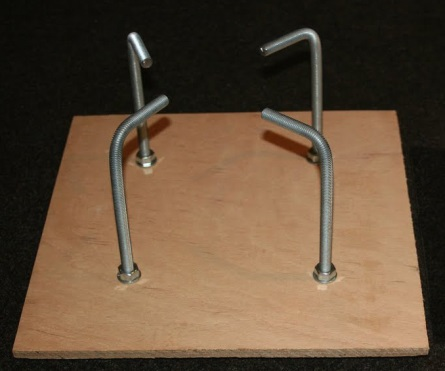
Plywood pier template with L-Bolts installed and ready to be inverted and pressed into the wet concrete.

Levelling the Pier base template before pouring the concrete. Once you are happy, pour the concrete and invert the template, gently pressing the rods into the wet concrete to avoid bubbles. Once in plate, screws the edges down or put a heavy weight on top to ensure it remains square to the former. Make sure that the bolts protrude enough to attach the pier base – this plywood is quite thick so when removed they protrude enough. They can always be cut down if too long, but material cannot be added later!
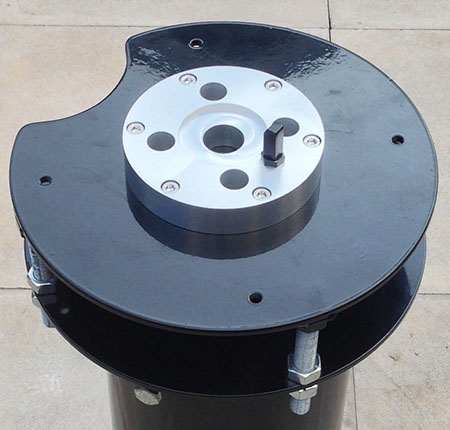
Section 2: Installing the pier-top and mount-adapter:
12) Install the mount-adapter. Most medium-duty mounts require a centre bolt (usually M10) to come up through the pier adapter and pier top-plate to fasten them down. Holes are provided in the pier top and pier adapter for this purpose. If you do not want to use the existing bolt from your tripod, you can use an M10 bolt to fix most medium duty mounts down.
13) When fastening the pier-top to the pier base, there is no need to over-tighten the side bolts to the
point where they distort the pier top. If your telescope is balanced on its mount, then it doesn’t put much strain on the pier-top anyway. We recommend using your judgement. Remember to rotate the pier into rough North-South alignment before tightening it down. Fine adjustments can be made later with the Azimuth rotation controls on your mount.
14) You can level the pier top with or without the pier adapter attached. If the adapter is attached, check the position of the azimuth stop bolts and rotate the pier top so that when the mount is installed, it’s pointing roughly along the North/South axis for easier polar alignment. Final adjustments can be made using the fine Azimuth adjustment on our mount which usually push against the sides AZ stop bolt.
15) Levelling the pier top. The pier top can be levelled by adjusting the 4x heavy duty 16mm thick steel bolts at each corner, or rotated by loosening the side-bolts. A builder’s spirit level is usually better than the bubble level built into most mounts. Once the mount is installed and pointing in the right direction, you can adjust the large levelling bolts to bring the upper and lower plates closer together. Levelling doesn’t need to be perfect, but it does help polar alignment and the setup, plus balancing of GOTO mounts. Also, it looks a lot neater. Once the mount head is installed and levelled, you can minimise the distance between the two pier top plates or provide a little separation to use as a “shelf” to store items like hand controllers and so-on. Tighten the middle locking bolts when ready and you’re done! Please note: There’s no need to over-tighten the big M16 levelling bolts, because it will just make adjustment more difficult later. The levelling bolts are capable of exerting over two tons of pressure and they are extremely strong, so there is no need to overtighten anything. All you need to do now is polar align your mount and enjoy a drastically reduced setup time for observing and imaging.
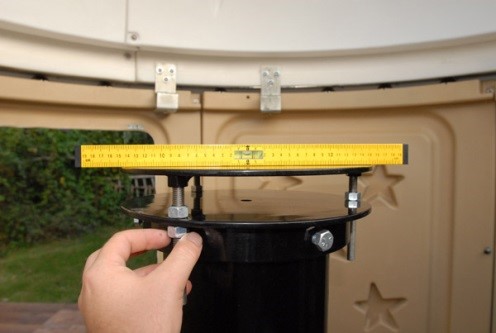
Levelling a Pier with the levelling bolts.
Example pier adaptor. (Older style pier top with scallop).
Caring for your pier: Your Altair SkyShed pier is very corrosion-resistant. It’s blasted with steel grit to
remove any surface rust, then flame-sprayed with zinc before being powder-coated and baked in an
oven. This is a marine-grade anti-corrosion process, and because no paints are used, the chances of
corrosion are very low even if the powder coat is chipped off by heavy impact. To keep your pier
looking clean and new, just wipe it down with a car detailing product and a micro-fibre cloth. The
bolts are good quality steel with a corrosion-resistant zinc coating. They may dull slightly over time
like any coated metals, however a quick spray and wipe with WD40 or bike/auto-detailing
compound will stabilise the finish for longer.
Decking installation: Many customers install our piers with decking around them. The pier protrudes through the decking, and it doesn’t actually touch the decking surface. This way no vibration is transmitted to the telescope. Decking provides a nice stable, level surface around the pier. What’s more, it’s very forgiving should you drop something delicate. Ice doesn’t form as easily on decking compared to hard masonry surfaces like concrete (decking is best installed with a slight tilt so water runs off down the grooves). Whilst you don’t need an observatory to enjoy the benefits of a pier, many customers install the pier first, with plans to put an observatory on the decking later on. That gives you time to plan your observatory, whilst still enjoying the benefits of a perfectly aligned, rigid telescope setup.
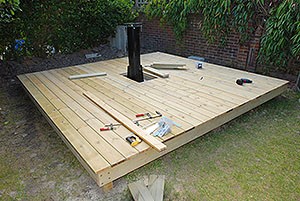
“Isolated” pier with decking. In the final installation, the pier will not touch the decking, so there is no chance of vibration causing problems with your telescope! Wooden decking is the best way to enjoy good seeing, because it doesn’t radiate heat all night like concrete does.

Pier on decking with SkyShed observatory dome.
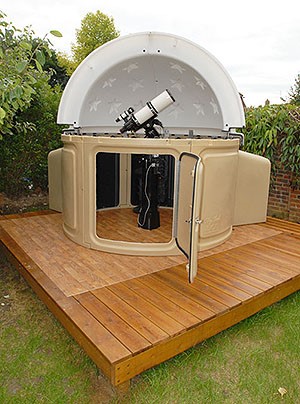
Pier on decking with SkyShed observatory dome.
